
The good and bad thing about making an everyday journal out of a blank (dotted or grid) journal is that it is blank – the good is full of possibilities, no pressure with blank dated pages to make you feel guilty, or being overwhelmed by the 12 grids of calendar months staring blankly etc. The bad, or can be bad, is the blankness of the whole journal can feel overwhelming, bringing up questions like: What do I include? What do I include first, second, and so forth? I usually feel all of these to some degree when I start my everyday yearly journal.First, I want to say, there is no absolute right or wrong way to order and develop an everyday journal. The beauty of it is that it is totally adaptable to your lifestyle for that year and there is no pressure to do it the same way each year or how someone else does it. I am sharing a few ways I organize mine in this post, but am putting it together in a way that suits my phase in life and how I sense God leading me this coming year.One thing that has been consistent with my journals is that I dedicate the first spread to the word for that year, its definition, a relevant verse and/or quote, and some imagery that reflects my response to the word.In the Leuchtturm Medium Dotted journal I use (link at the end of post) there are page numbers and three pages of Contents with space to write the page number and what is on that page. I find this extremely helpful and freeing. It is helpful, because I can look at the contents and find what I am looking for easily. This takes off the pressure of having to plan out my journal. For example, I added a Books Read page in a random place in my journal. Then I listed it in the table of contents and also folded a piece of Washi tape over the edge of the page. All the page edges with tape folded over them are “special” pages, meaning pages that aren’t just my journal writing.

Here is how I am doing the calendar parts of my journal this year:I have a Year at a Glance page on page 1, showing the entire year on one page. Across from it, on the left-hand side I have my basic themes and symbols. I’m still working on my symbols, so those thoughts are written/doodled in pencil until they become clearer.

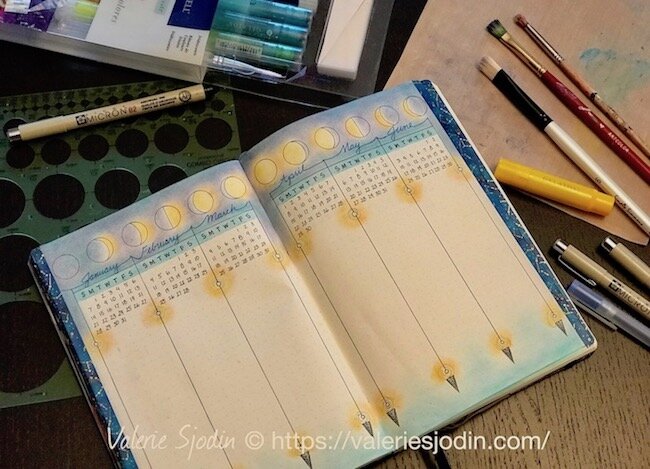
I’ve added two 6-Month at a Glance spreads. January - June and July – December. They didn’t end up following the Year at a Glance because I didn’t think of it before I had done more pages, but no worries. I did them, and lined the edges with Washi tape, then wrote their titles and page numbers in the index. I colored them using Gelatos and colored pencils. Now they are ready for the events already scheduled for 2018.[/vc_column_text]

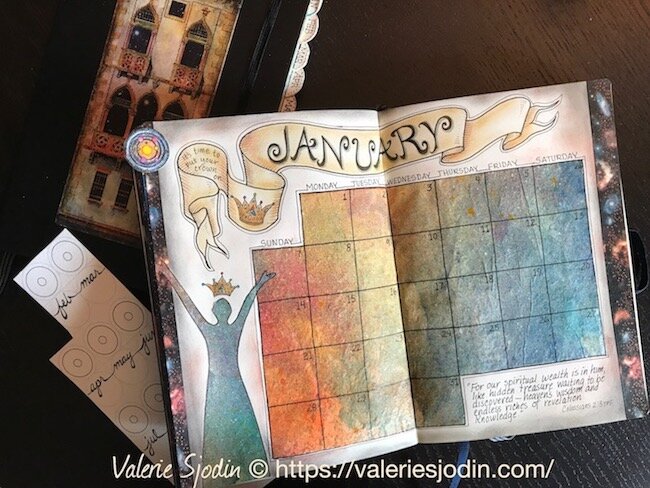
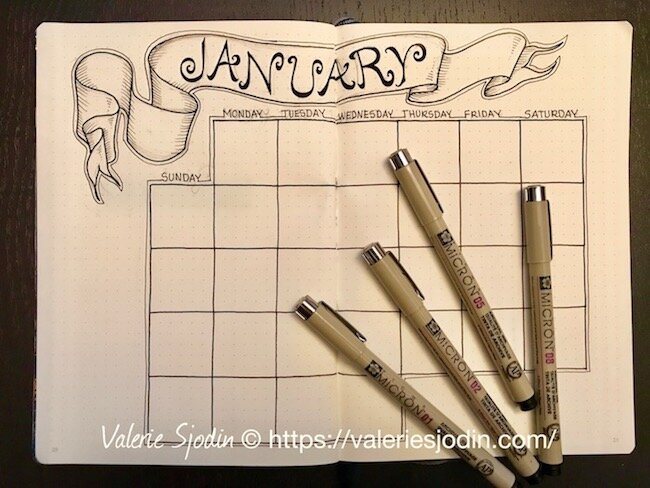
Each month I dedicate a 2-page spread to the monthly calendar. This is very therapeutic for me. Here are the steps:
Draw the calendar grid in pencil.

https://www.valeriesjodin.com/blog/2017/12/calendar-everyday-journal
Draw/Write the name of the month (I’m using banner scrolls again this year)
Write the names of the days of the week across the top
Trace over it with pen, erase pencil lines
https://www.valeriesjodin.com/blog/2017/12/calendar-everyday-journal
These next steps do not have to be in any particular order and can be adjusted and changed to suit the mood and style of the calendar page. I do what I am sure of first.- Add Washi tape to the side edge/s. It can be simple like this page or fancy. Shown is the simplest way, folded over the edge on the left side and the tape applied vertically on the right, not folded.- Trace, cut, and glue painted paper with a glue stick. I used a piece of deli paper I had previously painted. Deli paper or tracing paper or strong tissue paper work well because they are translucent. Sometimes I cut squares or just glue the larger piece of translucent painted paper down on calendar. The lines can be redrawn on top if desired.

Add more imagery, words and/or Washi tape. The figure stencil used is one I designed and use often. It is made by StencilGirl® Products

Add more color with Gelatos on background and scroll. Then refine and add a bit more depth using colored pencils as desired

- Color and cut out the tab of the month and glue into place- Enter month's 2-page spread and their page numbers in the Contents section of the journal

NOTE: Some people also include a weekly journal set up. In the past I found that helpful, but right now I find it best for me to just write the day and date in the next available space in my journal, including any lists, and not plan ahead.
Links to Posts about Word-of-the-Year & Everyday Journaling:
About exploring a word of the year:https://valeriesjodin.com/2016/01/my-word-and-shape-for-2016-flowing-out/
A surprise that led to an animal of the year:https://valeriesjodin.com/2016/01/surprise-animal-of-year-yes/"Why Journal? The Benefits of Journaling" .
In addition to the post contents, check out the comments. People have contributed great reasons for journal keeping.If you are seeking a Word for the year, you may find inspiration in the post "Listening for My Word of the Year."
Visit my Pinterest Board: https://www.pinterest.com/valeriesjodin/everyday-yearly-journals/
Cosmic Galaxy & Space theme Washi tape Purchase Online from Etsy by PasoKuma